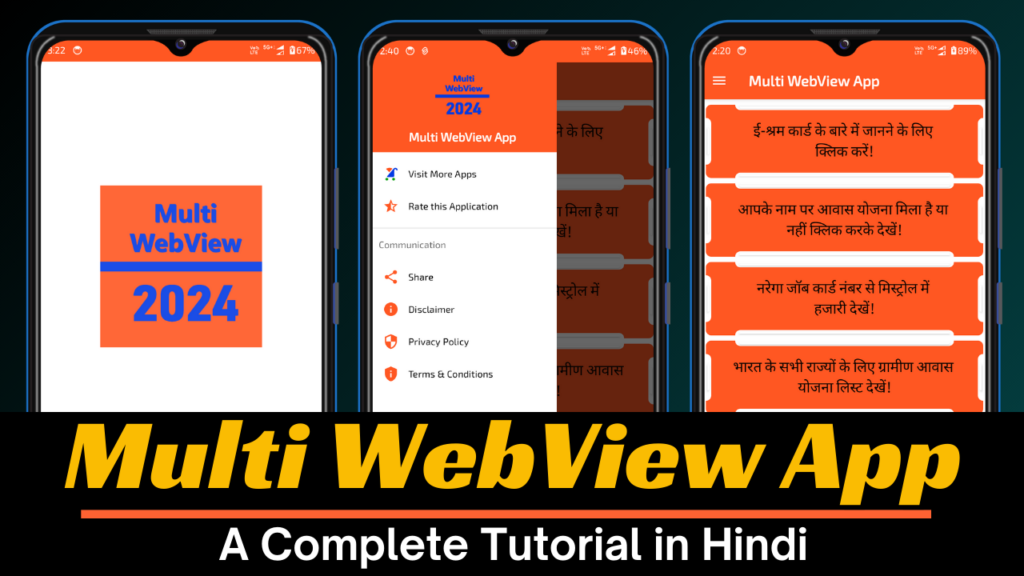
- How to Create a Splash Screen.
- How to Create a Navigation Drawer Menu.
- How to Create a Recycler View Layout in Fragment Layout.
- How to Create a Webview Layout in Fragment Layout.
- How to Create a Disclaimer Layout in Fragment Layout.
NOTE: Use IDE Version:- [Android Studio Koala | 2024.1.1 Patch 1] Or Above !
1. How to Create a Splash Screen.
Copy all string codes for this project, which are given below.
<string name="developed_by_click2code">Developed by: <b>CLICK2CODE</b></string>
<string name="website_title">Website Title</string>
<!-- Navigation Menu Items -->
<string name="more_apps">Visit More Apps</string>
<string name="rate_this_app">Rate this Application</string>
<string name="communication">Communication</string>
<string name="share">Share</string>
<string name="disclaimer">Disclaimer</string>
<string name="privacy_policy">Privacy Policy</string>
<string name="terms_conditions"><![CDATA[Terms & Conditions]]></string>
<!-- Drawer Layout Items -->
<string name="drawer_open">Drawer Open</string>
<string name="drawer_close">Drawer Close</string>
<!-- Navigation Menu Links -->
<string name="text_plain">text/plain</string>
<string name="AppDescription"><b>Multi WebView Template</b> : के तहत जो भी लिस्ट निकलता है उसका सभी विवरण यंहा तत्काल अपलोड कर दिया जाता है , <b>Download</b> करें इस Application को और अपने सुविधा अनुसार उपयोग करें ! </string>
<string name="AppLink"><![CDATA[https://play.google.com/store/apps/details?id=com.nilkanthpawan.nilkanthpawan&hl=en]]></string>
<string name="sub_here">Your Subject Here</string>
<string name="shareUsing">Share using</string>
<string name="packageDetails">market://details?id=</string>
<string name="packageDetail">http://play.google.com/store/apps/details?id=</string>
<string name="privacyLink">https://nilkanthpawanapps.blogspot.com/2022/02/privacy-policy-nilkanth-pawan-built.html</string>
<string name="termsLink">https://nilkanthpawanapps.blogspot.com/2022/02/terms-conditions-by-downloading-or.html</string>
<string name="developerApps">https://play.google.com/store/apps/developer?id=pub:SLPPSAJ+Studio</string>
<string name="DeveloperApp"><![CDATA[market://search?q=pub:SLPPSAJ+Studio&c=apps]]></string>
<string name="refresh">Refresh</string>
<!-- Disclaimer Layout Links Below -->
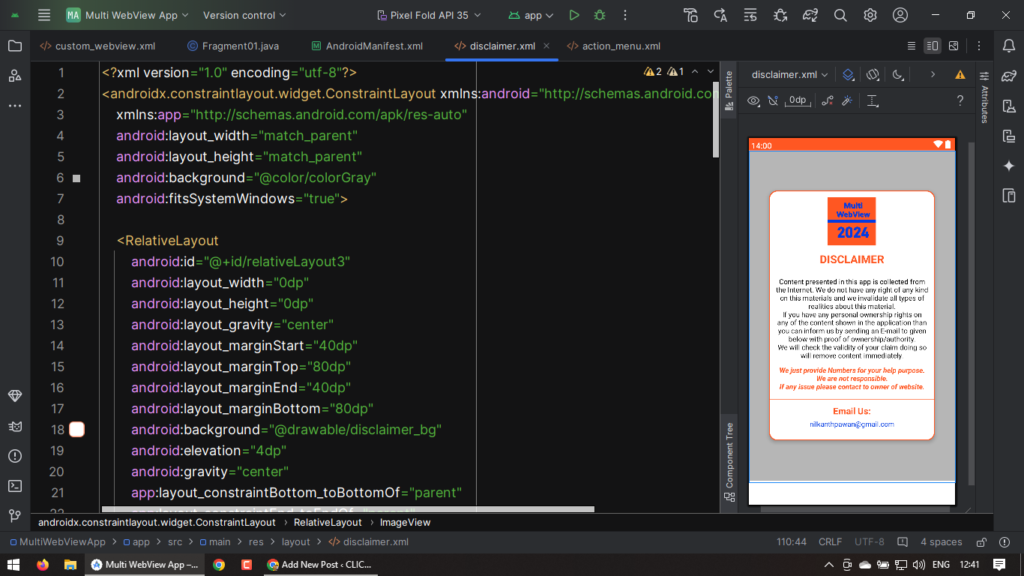
<string name="email_id">Email Us:</string>
<string name="emailId">nilkanthpawan@gmail.com</string>
<string name="about_disclaimer">Content presented in this app is collected from the Internet. We do not have any right of any kind on this materials and we invalidate all types of realities about this material.\nIf you have any personal ownership rights on any of the content shown in the application than you can inform us by sending an E-mail to given below with proof of ownership/authority.\nWe will check the validity of your claim doing so will remove content immediately.</string>
<string name="about_disclaimer_short">We just provide Numbers for your help purpose. We are not responsible.\nIf any issue please contact to owner of website.</string>
<string name="version_name">V-1.1.0</string>
<!-- All WebView Links Given Below -->
<string name="one_link">https://eshram.gov.in/</string>
<string name="two_link">https://pmaymis.gov.in/Open/Find_Beneficiary_Details.aspx</string>
<string name="three_link">https://rhreporting.nic.in/netiay/SECCReport/report_categorywiseseccverification.aspx/</string>
<string name="four_link">https://rhreporting.nic.in/netiay/benificiary.aspx</string>
<string name="five_link">https://pmaymis.gov.in/</string>
<string name="six_link">https://pmaymis.gov.in/Open/Find_Beneficiary_Details.aspx</string>
<string name="seven_link">https://pmaymis.gov.in/Track_Application_Status.aspx</string>
<string name="eight_link">http://sbm.gov.in/sbmReport/Report/Physical/SBM_TargetVsAchievementWithout1314.aspx</string>
<string name="nine_link">https://www.india.gov.in/hi/spotlight/%E0%A4%AA%E0%A5%8D%E0%A4%B0%E0%A4%A7%E0%A4%BE%E0%A4%A8%E0%A4%AE%E0%A4%82%E0%A4%A4%E0%A5%8D%E0%A4%B0%E0%A5%80-%E0%A4%89%E0%A4%9C%E0%A5%8D%E0%A4%9C%E0%A4%B5%E0%A4%B2%E0%A4%BE-%E0%A4%AF%E0%A5%8B%E0%A4%9C%E0%A4%A8%E0%A4%BE#tab=tab-1</string>
<string name="ten_link">https://mnregaweb2.nic.in/netnrega/dynamic_account_details_ippe.aspx</string>
<string name="eleven_link">https://nrega.nic.in/netnrega/HomeGP.aspx</string>
<string name="twelve_link">https://nsap.nic.in/</string>
<string name="thirteen_link">https://egramswaraj.gov.in/actionPlanReportForGP.do</string>
<string name="fourteen_link">https://pmkisan.gov.in/</string>
<string name="fifteen_link">http://mnregaweb4.nic.in/netnrega/workers/wrkinfo.aspx</string>
<string name="sixteen_link">https://pmkisan.gov.in/BeneficiaryStatus.aspx</string>
<string name="seventeen_link">https://pmkisan.gov.in/Rpt_BeneficiaryStatus_pub.aspx</string>
<string name="eighteen_link">https://pmkisan.gov.in/FarmerStatus.aspx</string>
<string name="nineteen_link">https://pmkisan.gov.in/aadharekyc.aspx</string>
<string name="twenty_link">https://pmkisan.gov.in/SearchSelfRegisterfarmerDetailsNew.aspx</string>
Create all app color codes are given below:
<color name="purple_200">#FF5722</color>
<color name="purple_500">#FF5722</color>
<color name="purple_700">#FF5722</color>
<color name="teal_200">#FF5722</color>
<color name="teal_700">#FF5722</color>
<color name="black">#FF000000</color>
<color name="white">#FFFFFFFF</color>
<color name="colorGray">#B6B6B6</color>
<color name="yellow">#FFC107</color>
<color name="green">#019E07</color>
<color name="orange">#FF511A</color>
<color name="blue">#033BE3</color>
Change Dark Action Bar to No Action Bar in the Theme file.
Theme.MaterialComponents.DayNight.NoActionBar
Import LottieFile Dependency in the “Gradle” File.
// Dependency Lottie Effect
implementation libs.lottie
Create a Splash Screen animation codes are given below.
<?xml version="1.0" encoding="utf-8"?>
<alpha xmlns:android="http://schemas.android.com/apk/res/android"
    android:fromAlpha="0.0"
    android:toAlpha="1.0"
    android:duration="1800">

</alpha>
If you want to download the Splash Screen Animation file then click below download button below to download these codes.
Get the Latest animation file for a splash screen only.
Now If you want to use our app icon then you have to download the below button.
Get the Latest app icon for testing purposes only.
Create a screen background code and fit layout codes.
android:background="@color/white"
android:fitsSystemWindows="true"
Create an ImgaeView code for showing the logo on the splash screen.
<ImageView
    android:id="@+id/logo"
    android:layout_width="240dp"
    android:layout_height="240dp"
    android:contentDescription="@string/app_name"
    android:src="@drawable/logo"
    app:layout_constraintBottom_toBottomOf="parent"
    app:layout_constraintEnd_toEndOf="parent"
    app:layout_constraintStart_toStartOf="parent"
    app:layout_constraintTop_toTopOf="parent"
    app:layout_constraintVertical_bias="0.28" />
Create a splash screen loading progress bar in this project.
<ProgressBar
    android:id="@+id/progressBar"
    android:layout_width="32dp"
    android:layout_height="32dp"
    app:layout_constraintBottom_toBottomOf="parent"
    app:layout_constraintEnd_toEndOf="parent"
    app:layout_constraintStart_toStartOf="parent"
    app:layout_constraintTop_toBottomOf="@+id/logo"
    app:layout_constraintVertical_bias="0.5" />
Create the developer name at the bottom of the splash screen.
<TextView
    android:id="@+id/developedBy"
    android:layout_width="wrap_content"
    android:layout_height="wrap_content"
    android:layout_marginBottom="2dp"
    android:text="@string/developed_by_click2code"
    android:textColor="@color/black"
    app:layout_constraintBottom_toBottomOf="parent"
    app:layout_constraintEnd_toEndOf="parent"
    app:layout_constraintStart_toStartOf="parent"
    app:layout_constraintTop_toBottomOf="@+id/progressBar"
    app:layout_constraintVertical_bias="1" />
:::::: Java Codes implemented Below ::::::
we have to import all splash screen code in the “SplashActivity” file.
ImageView imageView = findViewById(R.id.logo);
ProgressBar progressBar = findViewById(R.id.progressBar);
TextView textView = findViewById(R.id.developedBy);
we use a Handler with post delay to move one Activity to another Activity.
int splashTimeOut = 2500;
new Handler().postDelayed(() -> {
    Intent intent = new Intent(MainActivity.this, HomeActivity.class);
    startActivity(intent);
    finish();

}, splashTimeOut);
Now, apply an animation system to show attractiveness for the splash screen:
Animation animation = AnimationUtils.loadAnimation(this, R.anim.splash_screen_animation);
imageView.startAnimation(animation);
progressBar.startAnimation(animation);
textView.startAnimation(animation);
2. How to Create a Navigation Drawer Menu.
First, we must create a navigation header layout with the codes below.
android:layout_height="176dp"
android:background="@color/purple_200"
android:fitsSystemWindows="true"
android:gravity="center"
android:orientation="vertical"
<ImageView
        android:layout_width="80dp"
        android:layout_height="80dp"
        android:contentDescription="@string/app_name"
        android:elevation="4dp"
        android:src="@drawable/logo" />
<TextView
        android:id="@+id/header_title"
        android:layout_width="match_parent"
        android:layout_height="wrap_content"
        android:layout_marginTop="8dp"
        android:gravity="center_horizontal"
        android:text="@string/custom_app_name"
        android:textAppearance="@style/TextAppearance.AppCompat.Medium"
        android:textColor="@color/white"
        android:textStyle="bold" />
Now create a navigation menu items icon that shows in the navigation drawer. The menu items are given below.
Get all the menu items icon file
Now, create navigation drawer menu items which are given below.
<?xml version="1.0" encoding="utf-8"?>
<menu xmlns:android="http://schemas.android.com/apk/res/android">
    <group android:checkableBehavior="single">

        <item
            android:id="@+id/nav_more_apps"
            android:icon="@drawable/ic_nav_menu_more_apps"
            android:title="@string/more_apps" />

        <item
            android:id="@+id/nav_rate_this_app"
            android:icon="@drawable/ic_nav_menu_star_half"
            android:title="@string/rate_this_app" />

    </group>
    <item android:title="@string/communication">
        <menu>
            <item
                android:id="@+id/nav_share"
                android:icon="@drawable/ic_nav_share"
                android:title="@string/share" />
            <item
                android:id="@+id/nav_disclaimer"
                android:icon="@drawable/ic_nav_menu_info"
                android:title="@string/disclaimer" />
            <item
                android:id="@+id/nav_privacy_policy"
                android:icon="@drawable/ic_nav_menu_security"
                android:title="@string/privacy_policy" />
            <item
                android:id="@+id/nav_terms_conditions"
                android:icon="@drawable/ic_nav_menu_privacy_tip"
                android:title="@string/terms_conditions" />
        </menu>
    </item>

</menu>
Now, we move the “activity_home.xml” layout and we create all layout step by step.
Create a Drawer Layout:
<?xml version="1.0" encoding="utf-8"?>
<androidx.drawerlayout.widget.DrawerLayout xmlns:android="http://schemas.android.com/apk/res/android"
    xmlns:app="http://schemas.android.com/apk/res-auto"
    xmlns:tools="http://schemas.android.com/tools"
    android:id="@+id/drawerLayout"
    android:layout_width="match_parent"
    android:layout_height="match_parent"
    android:background="@color/white"
    android:fitsSystemWindows="true"
    tools:context=".HomeActivity">

</androidx.drawerlayout.widget.DrawerLayout>
Create a CoordinatorLayout:
<androidx.coordinatorlayout.widget.CoordinatorLayout
    android:layout_width="match_parent"
    android:layout_height="match_parent">

</androidx.coordinatorlayout.widget.CoordinatorLayout>
Create an AppBar Layout:
<com.google.android.material.appbar.AppBarLayout
    android:id="@+id/appBarLayout"
    android:layout_width="match_parent"
    android:layout_height="wrap_content"
    android:theme="@style/ThemeOverlay.AppCompat.Dark.ActionBar">

</com.google.android.material.appbar.AppBarLayout>
Create a ToolBar Layout:
<androidx.appcompat.widget.Toolbar
    android:id="@+id/toolBar"
    android:layout_width="match_parent"
    android:layout_height="?attr/actionBarSize"
    android:theme="@style/ThemeOverlay.AppCompat.Dark.ActionBar">

</androidx.appcompat.widget.Toolbar>
Create a Constraint Layout:
<androidx.constraintlayout.widget.ConstraintLayout
    android:layout_width="match_parent"
    android:layout_height="match_parent">

</androidx.constraintlayout.widget.ConstraintLayout>
Create a TextView Layout:
<TextView
    android:id="@+id/textView"
    android:layout_width="0dp"
    android:layout_height="wrap_content"
    android:text="@string/custom_app_name"
    android:textAppearance="@style/TextAppearance.AppCompat.Large"
    android:textStyle="bold"
    app:layout_constraintBottom_toBottomOf="parent"
    app:layout_constraintEnd_toEndOf="parent"
    app:layout_constraintStart_toStartOf="parent"
    app:layout_constraintTop_toTopOf="parent" />
Create a Navigation View Layout:
<com.google.android.material.navigation.NavigationView
    android:id="@+id/navigationMenu"
    android:layout_width="wrap_content"
    android:layout_height="match_parent"
    android:layout_gravity="start"
    android:scrollbars="vertical"
    app:menu="@menu/navigation_menu" />
::::> Now, go to the “HomeActivity.java” file and import the connect navigation drawer menu codes.
First, We Import Variable:
ActionBarDrawerToggle actionBarDrawerToggle;
View view;
private DrawerLayout drawerLayout;
Second, We Import ToolBar:
Toolbar toolbar = findViewById(R.id.toolBar);
        setSupportActionBar(toolbar);
        Objects.requireNonNull(getSupportActionBar()).setTitle(null);
        getSupportActionBar().setDisplayHomeAsUpEnabled(true);
Third, Import Drawer Layout:
drawerLayout = findViewById(R.id.drawerLayout);
        actionBarDrawerToggle = new ActionBarDrawerToggle(HomeActivity.this, drawerLayout, R.string.drawer_open, R.string.drawer_close);
        actionBarDrawerToggle.getDrawerArrowDrawable().setColor(getResources().getColor(R.color.white));
        drawerLayout.addDrawerListener(actionBarDrawerToggle);
        actionBarDrawerToggle.syncState();
Fourth, Create Navigation View:
NavigationView navigationView = findViewById(R.id.navigationMenu);
        view = navigationView.inflateHeaderView(R.layout.navigation_header);
        navigationView.setItemIconTintList(null);
Fifth, Create a set navigation Item Selected Listener:
navigationView.setNavigationItemSelectedListener(item -> {
            UserMenuSelector(item);
            return false;
        });
Sixth, Import on option item selected method:
@Override
    public boolean onOptionsItemSelected(@NonNull MenuItem item) {
        int id = item.getItemId();
        if (actionBarDrawerToggle.onOptionsItemSelected(item))
            return true;
        return super.onOptionsItemSelected(item);
    }
Seventh, Import on user menu selector method chosen:
private void UserMenuSelector(MenuItem item) {

    int itemID = item.getItemId();

    if (itemID == R.id.nav_more_apps) {

        try {
            Intent intent = new Intent(Intent.ACTION_VIEW, Uri.parse(getString(R.string.DeveloperApp)));
            startActivity(intent);
        } catch (Exception ex) {
            Intent intent = new Intent(Intent.ACTION_VIEW, Uri.parse(getString(R.string.developerApps)));
            startActivity(intent);
        }

    } else if (itemID == R.id.nav_rate_this_app) {
        try {
            startActivity(new Intent(Intent.ACTION_VIEW, Uri.parse("market://details?id=" + getPackageName())));

        } catch (ActivityNotFoundException e) {
            startActivity(new Intent(Intent.ACTION_VIEW, Uri.parse("http://play.google.com/store/apps/details?id=" + getPackageName())));
        }

    } else if (itemID == R.id.nav_share) {
        Intent myIntent = new Intent(Intent.ACTION_SEND);
        myIntent.setType(getString(R.string.text_plain));
        String shareBody = getString(R.string.AppDescription) + getString(R.string.AppLink);
        String shareSub = getString(R.string.sub_here);
        myIntent.putExtra(Intent.EXTRA_SUBJECT, shareSub);
        myIntent.putExtra(Intent.EXTRA_TEXT, shareBody);
        startActivity(Intent.createChooser(myIntent, getString(R.string.shareUsing)));

    } else if (itemID == R.id.nav_disclaimer) {

    } else if (itemID == R.id.nav_privacy_policy) {

    } else if (itemID == R.id.nav_terms_conditions) {

    }
    drawerLayout.closeDrawer(GravityCompat.START);
}
3. How to Create a Recycler View Layout in Fragment Layout.
Now, first, we create a fragment container layout with a Frame Layout with the help of a Constraint Layout.
<androidx.constraintlayout.widget.ConstraintLayout
    android:layout_width="match_parent"
    android:layout_height="match_parent"
    android:layout_marginTop="?attr/actionBarSize">

</androidx.constraintlayout.widget.ConstraintLayout>
<FrameLayout
    android:id="@+id/fragmentContainerLayout"
    android:layout_width="0dp"
    android:layout_height="0dp"
    app:layout_constraintBottom_toBottomOf="parent"
    app:layout_constraintEnd_toEndOf="parent"
    app:layout_constraintStart_toStartOf="parent"
    app:layout_constraintTop_toTopOf="parent" />
Now, we create a recycler view layout in fragment_homa.xml layout. Also, we import some code in Constraint Layout.
android:background="@color/white"
android:fitsSystemWindows="true"
<androidx.recyclerview.widget.RecyclerView
    android:id="@+id/recycler_view"
    android:layout_width="match_parent"
    android:layout_height="match_parent"
    android:paddingBottom="8dp"
    app:layout_constraintBottom_toBottomOf="parent"
    app:layout_constraintEnd_toEndOf="parent"
    app:layout_constraintStart_toStartOf="parent"
    app:layout_constraintTop_toBottomOf="parent" />
Before, creating the model_layout.xml file you have to create a model background layout which is used to help design the model item.
Create a code of model_bg_0.xml layout:
<?xml version="1.0" encoding="utf-8"?>
<shape xmlns:android="http://schemas.android.com/apk/res/android"
    android:shape="rectangle">
    <solid android:color="@color/purple_200" />
    <corners android:radius="8dp" />

</shape>
Create a code of model_bg_1.xml layout:
<?xml version="1.0" encoding="utf-8"?>
<shape xmlns:android="http://schemas.android.com/apk/res/android"
    android:shape="rectangle">
    <solid android:color="@color/white" />
    <corners
        android:bottomLeftRadius="24dp"
        android:bottomRightRadius="24dp"
        android:topLeftRadius="0dp"
        android:topRightRadius="0dp" />

</shape>
Create a code of model_bg_2.xml layout:
<?xml version="1.0" encoding="utf-8"?>
<shape xmlns:android="http://schemas.android.com/apk/res/android"
    android:shape="rectangle">
    <solid android:color="@color/white" />
    <corners
        android:bottomLeftRadius="0dp"
        android:bottomRightRadius="0dp"
        android:topLeftRadius="24dp"
        android:topRightRadius="24dp" />

</shape>
Create a code of model_bg_3.xml layout:
<?xml version="1.0" encoding="utf-8"?>
<shape xmlns:android="http://schemas.android.com/apk/res/android"
    android:shape="rectangle">
    <solid android:color="@color/white" />
    <corners
        android:bottomLeftRadius="0dp"
        android:bottomRightRadius="24dp"
        android:topLeftRadius="0dp"
        android:topRightRadius="24dp" />

</shape>
Create a code of model_bg_4.xml layout:
<?xml version="1.0" encoding="utf-8"?>
<shape xmlns:android="http://schemas.android.com/apk/res/android"
    android:shape="rectangle">
    <solid android:color="@color/white" />
    <corners
        android:bottomLeftRadius="24dp"
        android:bottomRightRadius="0dp"
        android:topLeftRadius="24dp"
        android:topRightRadius="0dp" />

</shape>
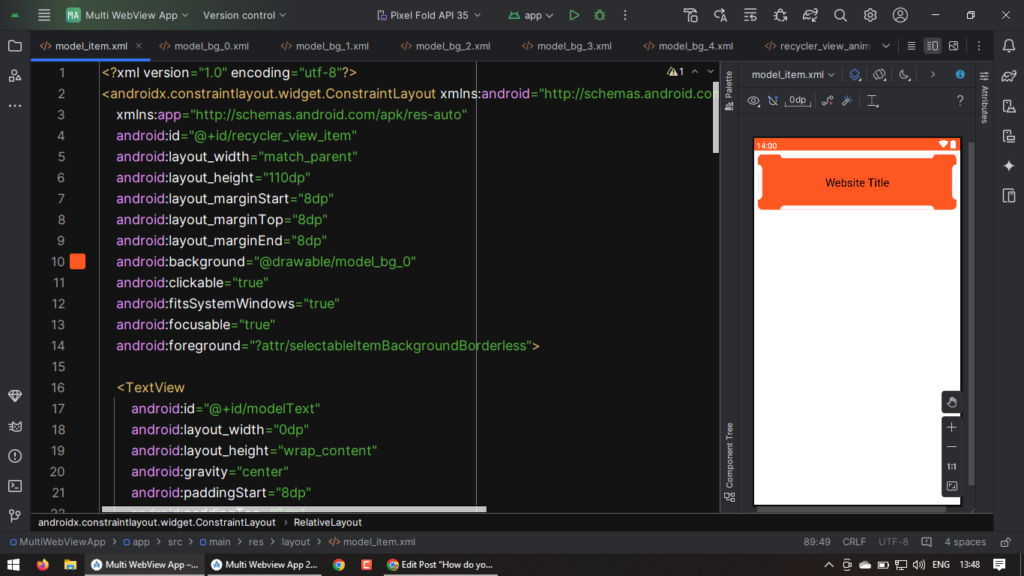
Now, we create a model layout for the recycler view layout, which means if you are going to create a recycler view layout then you must create a model_item.xml layout.
After creating the model_item.xml layout then you can insert the below code.
<?xml version="1.0" encoding="utf-8"?>
<androidx.constraintlayout.widget.ConstraintLayout xmlns:android="http://schemas.android.com/apk/res/android"
    xmlns:app="http://schemas.android.com/apk/res-auto"
    android:id="@+id/recycler_view_item"
    android:layout_width="match_parent"
    android:layout_height="110dp"
    android:layout_marginStart="8dp"
    android:layout_marginTop="8dp"
    android:layout_marginEnd="8dp"
    android:background="@drawable/model_bg_0"
    android:clickable="true"
    android:fitsSystemWindows="true"
    android:focusable="true"
    android:foreground="?attr/selectableItemBackgroundBorderless">

</androidx.constraintlayout.widget.ConstraintLayout>
NOTE: All layouts are inserted under ConstraintLayout.
<TextView
    android:id="@+id/modelText"
    android:layout_width="0dp"
    android:layout_height="wrap_content"
    android:gravity="center"
    android:paddingStart="8dp"
    android:paddingTop="8dp"
    android:paddingEnd="8dp"
    android:paddingBottom="8dp"
    android:text="@string/website_title"
    android:textAppearance="@style/TextAppearance.AppCompat.Large"
    android:textColor="@color/black"
    app:layout_constraintBottom_toBottomOf="parent"
    app:layout_constraintEnd_toEndOf="parent"
    app:layout_constraintStart_toStartOf="parent"
    app:layout_constraintTop_toTopOf="parent" />
<RelativeLayout
    android:id="@+id/relativeLayout1"
    android:layout_width="0dp"
    android:layout_height="8dp"
    android:layout_marginStart="44dp"
    android:layout_marginEnd="44dp"
    android:background="@drawable/model_bg_1"
    android:gravity="center"
    app:layout_constraintBottom_toTopOf="@+id/modelText"
    app:layout_constraintEnd_toEndOf="parent"
    app:layout_constraintStart_toStartOf="parent"
    app:layout_constraintTop_toTopOf="parent"
    app:layout_constraintVertical_bias="0">

    <RelativeLayout
        android:layout_width="match_parent"
        android:layout_height="3dp"
        android:layout_marginStart="6dp"
        android:layout_marginEnd="6dp"
        android:background="@drawable/model_bg_1"
        android:elevation="2dp" />

</RelativeLayout>
<RelativeLayout
    android:id="@+id/relativeLayout2"
    android:layout_width="0dp"
    android:layout_height="8dp"
    android:layout_marginStart="44dp"
    android:layout_marginEnd="44dp"
    android:background="@drawable/model_bg_2"
    android:gravity="center"
    app:layout_constraintBottom_toBottomOf="parent"
    app:layout_constraintEnd_toEndOf="parent"
    app:layout_constraintStart_toStartOf="parent"
    app:layout_constraintTop_toBottomOf="@+id/modelText"
    app:layout_constraintVertical_bias="1">

    <RelativeLayout
        android:layout_width="match_parent"
        android:layout_height="3dp"
        android:layout_marginStart="6dp"
        android:layout_marginEnd="6dp"
        android:background="@drawable/model_bg_2"
        android:elevation="2dp" />

</RelativeLayout>
<RelativeLayout
    android:id="@+id/relativeLayout"
    android:layout_width="8dp"
    android:layout_height="70dp"
    android:background="@drawable/model_bg_3"
    android:gravity="center"
    app:layout_constraintBottom_toBottomOf="parent"
    app:layout_constraintEnd_toEndOf="@+id/modelText"
    app:layout_constraintHorizontal_bias="0"
    app:layout_constraintStart_toStartOf="@+id/modelText"
    app:layout_constraintTop_toTopOf="parent">

    <RelativeLayout
        android:layout_width="3dp"
        android:layout_height="40dp"
        android:background="@drawable/model_bg_3"
        android:elevation="2dp" />

</RelativeLayout>
<RelativeLayout
    android:id="@+id/relativeLayout4"
    android:layout_width="8dp"
    android:layout_height="70dp"
    android:background="@drawable/model_bg_4"
    android:gravity="center"
    app:layout_constraintBottom_toBottomOf="parent"
    app:layout_constraintEnd_toEndOf="@+id/modelText"
    app:layout_constraintHorizontal_bias="1"
    app:layout_constraintStart_toStartOf="@+id/modelText"
    app:layout_constraintTop_toTopOf="parent">

    <RelativeLayout
        android:layout_width="3dp"
        android:layout_height="40dp"
        android:background="@drawable/model_bg_4"
        android:elevation="2dp" />


</RelativeLayout>
Now, we have created a Model.java class for Recycler View.
String title;
// Create a Constructor for Model.java file.
// Constructor
public Model(String title) {
    this.title = title;
}
// Create a Getter and Setter for the Model.java file.
// Getter and Setter
public String getTitle() {
    return title;
}

public void setTitle(String title) {
    this.title = title;
}
Now, we have to create a recycler view animation layout named recycler_view_animation.
<?xml version="1.0" encoding="utf-8"?>
<set xmlns:android="http://schemas.android.com/apk/res/android">
    <alpha
        android:duration="500"
        android:fromAlpha="0"
        android:toAlpha="1" />

    <translate
        android:duration="500"
        android:fromYDelta="-200%"
        android:toYDelta="0%" />

</set>
Now, we create a HomeAdapter.java file.
Import HomeAdapter we have to create a extends method with RecyclerView with ViewHolder.
extends RecyclerView.Adapter<HomeAdapter.homeViewHolder>
First, we create an ArrayList in the variable.
ArrayList<Model> homeHolder;
Now, create a Constructor in the HomeAdapter.java file. After that, we create a Recycler View with a View Holder.
public static class homeViewHolder extends RecyclerView.ViewHolder {
    TextView header;
    ConstraintLayout constraintLayout;

    public homeViewHolder(@NonNull View itemView) {
        super(itemView);
        header = itemView.findViewById(R.id.modelText);
        constraintLayout = itemView.findViewById(R.id.recycler_view_item);
    }
}
we create an item size in getItemCount.
return homeHolder.size();
Now, we insert a model_item layout in the onCreateViewHolder method.
View view = LayoutInflater.from(parent.getContext()).inflate(R.layout.model_item, parent, false);
return new homeViewHolder(view);
Now, we can insert the model title and animation view using the onBindViewHolder method.
holder.header.setText(homeHolder.get(position).getTitle());
holder.constraintLayout.startAnimation(AnimationUtils.loadAnimation(holder.itemView.getContext(), R.anim.recycler_view_animation));
Now, we create a recycler view item using the click listener method under onBindViewHolder.
holder.itemView.setOnClickListener(v -> {
    switch (homeHolder.get(position).getTitle()) {

    }
});
Now, we create and insert all fragments using the click listener method.
case "ई-श्रम कार्ड के बारे में जानने के लिए \nक्लिक करें!": {
    AppCompatActivity activity = (AppCompatActivity) v.getContext();
    Fragment01 fragment = new Fragment01();
    activity.getSupportFragmentManager().beginTransaction().replace(R.id.fragmentContainer,
            fragment).addToBackStack(null).commit();
    break;
}
case "आपके नाम पर आवास योजना मिला है या \nनहीं क्लिक करके देखें!": {
    AppCompatActivity activity = (AppCompatActivity) v.getContext();
    Fragment02 fragment = new Fragment02();
    activity.getSupportFragmentManager().beginTransaction().replace(R.id.fragmentContainer,
            fragment).addToBackStack(null).commit();
    break;
}

case "नरेगा जॉब कार्ड नंबर से मिस्ट्रोल में \nहजारी देखें!": {
    AppCompatActivity activity = (AppCompatActivity) v.getContext();
    Fragment03 fragment = new Fragment03();
    activity.getSupportFragmentManager().beginTransaction().replace(R.id.fragmentContainer,
            fragment).addToBackStack(null).commit();
    break;
}

case "भारत के सभी राज्यों के लिए ग्रामीण आवास \nयोजना लिस्ट देखें!": {
    AppCompatActivity activity = (AppCompatActivity) v.getContext();
    Fragment04 fragment = new Fragment04();
    activity.getSupportFragmentManager().beginTransaction().replace(R.id.fragmentContainer,
            fragment).addToBackStack(null).commit();
    break;
}

case "रजिस्ट्री नंबर से आपको आवास मिला है \nदेखने के लिए क्लिक करें!": {
    AppCompatActivity activity = (AppCompatActivity) v.getContext();
    Fragment05 fragment = new Fragment05();
    activity.getSupportFragmentManager().beginTransaction().replace(R.id.fragmentContainer,
            fragment).addToBackStack(null).commit();
    break;
}

case "शहरी आवास योजना के बारे में जानना है \nयंहा क्लिक करें!": {
    AppCompatActivity activity = (AppCompatActivity) v.getContext();
    Fragment06 fragment = new Fragment06();
    activity.getSupportFragmentManager().beginTransaction().replace(R.id.fragmentContainer,
            fragment).addToBackStack(null).commit();
    break;
}

case "आधार कार्ड से देखें शहरी क्षेत्र के \nलोगों के लिए!": {
    AppCompatActivity activity = (AppCompatActivity) v.getContext();
    Fragment07 fragment = new Fragment07();
    activity.getSupportFragmentManager().beginTransaction().replace(R.id.fragmentContainer,
            fragment).addToBackStack(null).commit();
    break;
}

case "आवास योजना आवेदन की स्थिति देखें \nशहरी क्षेत्र के लोगों का!": {
    AppCompatActivity activity = (AppCompatActivity) v.getContext();
    Fragment08 fragment = new Fragment08();
    activity.getSupportFragmentManager().beginTransaction().replace(R.id.fragmentContainer,
            fragment).addToBackStack(null).commit();
    break;
}

case "सभी राज्यों के लिए शौचालय योजना लिस्ट \nयहाँ क्लिक करें!": {
    AppCompatActivity activity = (AppCompatActivity) v.getContext();
    Fragment09 fragment = new Fragment09();
    activity.getSupportFragmentManager().beginTransaction().replace(R.id.fragmentContainer,
            fragment).addToBackStack(null).commit();
    break;
}

case "उज्ज्वला योजना लिस्ट के बारे में जानना है \nयहाँ क्लिक करें!": {
    AppCompatActivity activity = (AppCompatActivity) v.getContext();
    Fragment10 fragment = new Fragment10();
    activity.getSupportFragmentManager().beginTransaction().replace(R.id.fragmentContainer,
            fragment).addToBackStack(null).commit();
    break;
}

case "बी0 पी0 ऐल0 सभी राज्यों का लिस्ट देखें \nयहाँ क्लिक करके!": {
    AppCompatActivity activity = (AppCompatActivity) v.getContext();
    Fragment11 fragment = new Fragment11();
    activity.getSupportFragmentManager().beginTransaction().replace(R.id.fragmentContainer,
            fragment).addToBackStack(null).commit();
    break;
}

case "अपने गांव में मनरेगा जॉब के बारे में \nयहां से देख सकतें हैं!": {
    AppCompatActivity activity = (AppCompatActivity) v.getContext();
    Fragment12 fragment = new Fragment12();
    activity.getSupportFragmentManager().beginTransaction().replace(R.id.fragmentContainer,
            fragment).addToBackStack(null).commit();
    break;
}

case "किसान का पेंशन सूची देखने के लिए \nयहाँ पर क्लिक करें!": {
    AppCompatActivity activity = (AppCompatActivity) v.getContext();
    Fragment13 fragment = new Fragment13();
    activity.getSupportFragmentManager().beginTransaction().replace(R.id.fragmentContainer,
            fragment).addToBackStack(null).commit();
    break;
}

case "अपने गाँव पंचायत का रिपोर्ट देखें \nयहाँ पर क्लिक करें!": {
    AppCompatActivity activity = (AppCompatActivity) v.getContext();
    Fragment14 fragment = new Fragment14();
    activity.getSupportFragmentManager().beginTransaction().replace(R.id.fragmentContainer,
            fragment).addToBackStack(null).commit();
    break;
}

case "किसान सम्मान निधि योजना किसको मिला \nयहां से देखें": {
    AppCompatActivity activity = (AppCompatActivity) v.getContext();
    Fragment15 fragment = new Fragment15();
    activity.getSupportFragmentManager().beginTransaction().replace(R.id.fragmentContainer,
            fragment).addToBackStack(null).commit();
    break;
}

case "किसान सम्मान निधि योजना से लाभार्थी \nका स्टेटस चेक करें!": {
    AppCompatActivity activity = (AppCompatActivity) v.getContext();
    Fragment16 fragment = new Fragment16();
    activity.getSupportFragmentManager().beginTransaction().replace(R.id.fragmentContainer,
            fragment).addToBackStack(null).commit();
    break;
}

case "देखें किसान सम्मान निधि योजना \nलाभार्थी सूची यहाँ से!": {
    AppCompatActivity activity = (AppCompatActivity) v.getContext();
    Fragment17 fragment = new Fragment17();
    activity.getSupportFragmentManager().beginTransaction().replace(R.id.fragmentContainer,
            fragment).addToBackStack(null).commit();
    break;
}

case "किसान सम्मान निधि योजना स्वपंजीकृत \nकिसानों की स्थिति देखें!": {
    AppCompatActivity activity = (AppCompatActivity) v.getContext();
    Fragment18 fragment = new Fragment18();
    activity.getSupportFragmentManager().beginTransaction().replace(R.id.fragmentContainer,
            fragment).addToBackStack(null).commit();
    break;
}

case "किसान सम्मान निधि योजना आधार ओटीपी \nदेखें KYC किसान!": {
    AppCompatActivity activity = (AppCompatActivity) v.getContext();
    Fragment19 fragment = new Fragment19();
    activity.getSupportFragmentManager().beginTransaction().replace(R.id.fragmentContainer,
            fragment).addToBackStack(null).commit();
    break;
}

case "स्व-पंजीकृत किसान विवरण संपादित करें देखें!": {
    AppCompatActivity activity = (AppCompatActivity) v.getContext();
    Fragment20 fragment = new Fragment20();
    activity.getSupportFragmentManager().beginTransaction().replace(R.id.fragmentContainer,
            fragment).addToBackStack(null).commit();
    break;
}
Now, come to the HomeFragment.java file we have to connect all topic layouts with the recycler layout.
View view = inflater.inflate(R.layout.home_fragment, container, false);

RecyclerView recyclerView = view.findViewById(R.id.recycler_view);
recyclerView.setLayoutManager(new LinearLayoutManager(getContext()));
ArrayList<Model> homeHolder = new ArrayList<>();

Model one = new Model("ई-श्रम कार्ड के बारे में जानने के लिए \nक्लिक करें!");
homeHolder.add(one);

Model two = new Model("आपके नाम पर आवास योजना मिला है या \nनहीं क्लिक करके देखें!");
homeHolder.add(two);

Model three = new Model("नरेगा जॉब कार्ड नंबर से मिस्ट्रोल में \nहजारी देखें!");
homeHolder.add(three);

Model four = new Model("भारत के सभी राज्यों के लिए ग्रामीण आवास \nयोजना लिस्ट देखें!");
homeHolder.add(four);

Model five = new Model("रजिस्ट्री नंबर से आपको आवास मिला है \nदेखने के लिए क्लिक करें!");
homeHolder.add(five);

Model six = new Model("शहरी आवास योजना के बारे में जानना है \nयंहा क्लिक करें!");
homeHolder.add(six);

Model seven = new Model("आधार कार्ड से देखें शहरी क्षेत्र के \nलोगों के लिए!");
homeHolder.add(seven);

Model eight = new Model("आवास योजना आवेदन की स्थिति देखें \nशहरी क्षेत्र के लोगों का!");
homeHolder.add(eight);

Model nine = new Model("सभी राज्यों के लिए शौचालय योजना लिस्ट \nयहाँ क्लिक करें!");
homeHolder.add(nine);

Model ten = new Model("उज्ज्वला योजना लिस्ट के बारे में जानना है \nयहाँ क्लिक करें!");
homeHolder.add(ten);

Model eleven = new Model("बी0 पी0 ऐल0 सभी राज्यों का लिस्ट देखें \nयहाँ क्लिक करके!");
homeHolder.add(eleven);

Model twelve = new Model("अपने गांव में मनरेगा जॉब के बारे में \nयहां से देख सकतें हैं!");
homeHolder.add(twelve);

Model thirteen = new Model("किसान का पेंशन सूची देखने के लिए \nयहाँ पर क्लिक करें!");
homeHolder.add(thirteen);

Model fourteen = new Model("अपने गाँव पंचायत का रिपोर्ट देखें \nयहाँ पर क्लिक करें!");
homeHolder.add(fourteen);

Model fifteen = new Model("किसान सम्मान निधि योजना किसको मिला \nयहां से देखें");
homeHolder.add(fifteen);

Model sixteen = new Model("किसान सम्मान निधि योजना से लाभार्थी \nका स्टेटस चेक करें!");
homeHolder.add(sixteen);

Model seventeen = new Model("देखें किसान सम्मान निधि योजना \nलाभार्थी सूची यहाँ से!");
homeHolder.add(seventeen);

Model eighteen = new Model("किसान सम्मान निधि योजना स्वपंजीकृत \nकिसानों की स्थिति देखें!");
homeHolder.add(eighteen);

Model nineteen = new Model("किसान सम्मान निधि योजना आधार ओटीपी \nदेखें KYC किसान!");
homeHolder.add(nineteen);

Model twenty = new Model("स्व-पंजीकृत किसान विवरण संपादित करें देखें!");
homeHolder.add(twenty);

recyclerView.setAdapter(new HomeAdapter(homeHolder));
return view;
4. How to Create a Webview Layout in Fragment Layout.
First, design a custom_webview.xml layout:
we create a Constraint layout:
<?xml version="1.0" encoding="utf-8"?>
<androidx.constraintlayout.widget.ConstraintLayout xmlns:android="http://schemas.android.com/apk/res/android"
    xmlns:app="http://schemas.android.com/apk/res-auto"
    android:layout_width="match_parent"
    android:layout_height="match_parent"
    android:background="@color/white"
    android:fitsSystemWindows="true">

</androidx.constraintlayout.widget.ConstraintLayout>
Now, import the webview layout under Constraint Layout.
<WebView
    android:id="@+id/web_view"
    android:layout_width="match_parent"
    android:layout_height="match_parent"
    app:layout_constraintBottom_toBottomOf="parent"
    app:layout_constraintEnd_toEndOf="@+id/progress_bar"
    app:layout_constraintStart_toStartOf="parent"
    app:layout_constraintTop_toTopOf="parent" />
Before proceeding further process, we have to download a webview progress bar.
Download the progress bar assets file.
Now, Lottie Animation View layout.
<com.airbnb.lottie.LottieAnimationView
    android:id="@+id/progress_bar"
    android:layout_width="match_parent"
    android:layout_height="148dp"
    app:layout_constraintBottom_toBottomOf="parent"
    app:layout_constraintEnd_toEndOf="parent"
    app:layout_constraintStart_toStartOf="parent"
    app:layout_constraintTop_toTopOf="parent"
    app:lottie_autoPlay="true"
    app:lottie_fileName="progress_bar_for_web_view.json"
    app:lottie_loop="true" />
Now, we have to create an action bar menu that shows the webview refresh button.
Create an action menu file named action_menu.xml given below.
<?xml version="1.0" encoding="utf-8"?>
<menu xmlns:android="http://schemas.android.com/apk/res/android"
    xmlns:app="http://schemas.android.com/apk/res-auto">

    <item
        android:id="@+id/refresh"
        android:icon="@drawable/ic_baseline_refresh"
        android:title="@string/refresh"
        app:showAsAction="always" />

</menu>
Now, we are going to connect with Java code followed by step by step.
Fragment created with “extends Fragment”
View view;
WebView webView;
view = inflater.inflate(R.layout.custom_webview, container, false);
 return view;
Implement Lottie Animation connection with XML layout.
// Lottie Animation ID Implemented Below
LottieAnimationView lottieAnimationView = view.findViewById(R.id.progress_bar);
Implement the Webview Layout code below.
// WebView Code Implemented Below
webView = view.findViewById(R.id.web_view);
webView.getSettings().setJavaScriptEnabled(true);
webView.getSettings().setLoadWithOverviewMode(true);
webView.getSettings().setUseWideViewPort(true);

webView.getSettings().setSupportZoom(true);
webView.getSettings().setBuiltInZoomControls(true);
webView.getSettings().setDisplayZoomControls(false);

webView.setScrollBarStyle(WebView.SCROLLBARS_OUTSIDE_OVERLAY);
webView.setScrollbarFadingEnabled(false);
webView.setWebViewClient(new WebViewClient() {
    @Override
    public void onPageStarted(WebView view, String url, Bitmap favicon) {
        super.onPageStarted(view, url, favicon);
        lottieAnimationView.setVisibility(View.VISIBLE);
    }

    @Override
    public void onPageFinished(WebView view, String url) {
        super.onPageFinished(view, url);
        lottieAnimationView.setVisibility(View.GONE);
    }
});
webView.loadUrl(getString(R.string.one_link));
webView.setOnKeyListener((view, i, keyEvent) -> {
    if (keyEvent.getAction() == KeyEvent.ACTION_DOWN) {
        if (i == KeyEvent.KEYCODE_BACK) {
            if (webView.canGoBack()) {
                webView.goBack();
            } else {
                Fragment01.this.requireActivity().onBackPressed();
            }
        }
    }
    return true;
});
Now, we have to create an action bar menu to implement the refresh button.
@Override
public void onCreate(@Nullable Bundle savedInstanceState) {
    setHasOptionsMenu(true);
    super.onCreate(savedInstanceState);
}
@Override
public void onCreateOptionsMenu(@NonNull Menu menu, @NonNull MenuInflater inflater) {
    inflater.inflate(R.menu.action_menu, menu);
    super.onCreateOptionsMenu(menu, inflater);
}
@Override
public boolean onOptionsItemSelected(@NonNull MenuItem item) {
    int id = item.getItemId();
    if (id == R.id.refresh) {
        webView.reload();
    }
    return super.onOptionsItemSelected(item);
}
5. How to Create a Disclaimer Layout in Fragment Layout.
For creating a disclaimer layout, first, we have to create a Constraint Layout is given below.
<?xml version="1.0" encoding="utf-8"?>
<androidx.constraintlayout.widget.ConstraintLayout xmlns:android="http://schemas.android.com/apk/res/android"
    xmlns:app="http://schemas.android.com/apk/res-auto"
    android:layout_width="match_parent"
    android:layout_height="match_parent"
    android:background="@color/colorGray"
    android:fitsSystemWindows="true">


</androidx.constraintlayout.widget.ConstraintLayout>
Under Constraint Layout we have to create a RelativeLayout.
<RelativeLayout
    android:id="@+id/relativeLayout3"
    android:layout_width="0dp"
    android:layout_height="0dp"
    android:layout_gravity="center"
    android:layout_marginStart="40dp"
    android:layout_marginTop="80dp"
    android:layout_marginEnd="40dp"
    android:layout_marginBottom="80dp"
    android:background="@drawable/disclaimer_bg"
    android:elevation="4dp"
    android:gravity="center"
    app:layout_constraintBottom_toBottomOf="parent"
    app:layout_constraintEnd_toEndOf="parent"
    app:layout_constraintStart_toStartOf="parent"
    app:layout_constraintTop_toTopOf="parent">


</RelativeLayout>
Under Relative Layout, we have to create a Linear Layout.
<LinearLayout
    android:layout_width="match_parent"
    android:layout_height="wrap_content"
    android:layout_marginTop="50dp"
    android:gravity="center"
    android:orientation="vertical">


</LinearLayout>
Under Linear Layout, we have to create a further TextView Layout that uses used code given below. All Layouts are implemented vertically step by step.
<TextView
    android:layout_width="wrap_content"
    android:layout_height="wrap_content"
    android:layout_gravity="center_horizontal"
    android:layout_marginTop="60dp"
    android:text="@string/disclaimer"
    android:textAllCaps="true"
    android:textAppearance="@style/TextAppearance.AppCompat.Large"
    android:textColor="@color/purple_200"
    android:textStyle="bold" />
<TextView
    android:layout_width="wrap_content"
    android:layout_height="wrap_content"
    android:layout_gravity="center_horizontal"
    android:layout_marginLeft="12dp"
    android:layout_marginTop="20dp"
    android:layout_marginRight="12dp"
    android:text="@string/about_disclaimer"
    android:textAlignment="center"
    android:textAppearance="@style/TextAppearance.AppCompat.Small"
    android:textColor="@color/black" />
<TextView
    android:layout_width="wrap_content"
    android:layout_height="wrap_content"
    android:layout_gravity="center_horizontal"
    android:layout_marginLeft="12dp"
    android:layout_marginTop="10dp"
    android:layout_marginRight="12dp"
    android:text="@string/about_disclaimer_short"
    android:textAlignment="center"
    android:textAppearance="@style/TextAppearance.AppCompat.Small"
    android:textColor="@color/purple_200"
    android:textStyle="bold|italic" />
<View
    android:layout_width="match_parent"
    android:layout_height="1dp"
    android:layout_marginTop="16dp"
    android:background="@color/purple_200" />
<TextView
    android:layout_width="wrap_content"
    android:layout_height="wrap_content"
    android:layout_gravity="center_horizontal"
    android:layout_marginTop="10dp"
    android:text="@string/email_id"
    android:textAppearance="@style/TextAppearance.AppCompat.Medium"
    android:textColor="@color/purple_200"
    android:textStyle="bold" />
<TextView
    android:id="@+id/sendMailID"
    android:layout_width="wrap_content"
    android:layout_height="wrap_content"
    android:layout_gravity="center_horizontal"
    android:layout_marginLeft="12dp"
    android:layout_marginTop="4dp"
    android:layout_marginRight="12dp"
    android:layout_marginBottom="12dp"
    android:text="@string/emailId"
    android:textAlignment="center"
    android:textAppearance="@style/TextAppearance.AppCompat.Small"
    android:textColor="@color/blue" />
We have to create an App logo means ImageView Layout which is implemented in the main app logo.
<ImageView
    android:id="@+id/dialog_image"
    android:layout_width="100dp"
    android:layout_height="100dp"
    android:layout_alignParentTop="true"
    android:layout_centerHorizontal="true"
    android:contentDescription="@string/app_name"
    android:padding="2dp"
    android:src="@drawable/logo" />
Now, If any users want to talk with you then you have to contact them via Email.
View view = inflater.inflate(R.layout.disclaimer, container, false);

TextView sendMail = view.findViewById(R.id.sendMailID);
sendMail.setOnClickListener(view1 -> {
    String email = FragmentDisclaimer.this.getResources().getString(R.string.emailId);
    Intent intent = new Intent(Intent.ACTION_SEND);
    String[] recipients = {email};
    intent.putExtra(Intent.EXTRA_EMAIL, recipients);
    intent.setType("text/html");
    intent.setPackage("com.google.android.gm");
    startActivity(Intent.createChooser(intent, "Send mail"));
});
return view;
< :::::::::: Thank You :::::::::: >
![Splash Screen for Multi Webview App. || Part – 01 || with [ Java Language ].](https://click2code.com/wp-content/uploads/2024/07/Black-and-Yellow-Modern-Trading-Tutorial-YouTube-Thumbnail-1024x576.png)
![Navigation Drawer Menu for Multi Webview App. || Part – 03 & 04 || with [ Java Language ].](https://click2code.com/wp-content/uploads/2024/07/Black-and-Yellow-Modern-Trading-Tutorial-YouTube-Thumbnail-1-1024x576.png)
![How to create a recycler view in fragment layout in Android Studio? | Part – 05[A] and 05[B] | Multi Webview App Tutorial](https://click2code.com/wp-content/uploads/2024/08/Black-and-Yellow-Modern-Trading-Tutorial-YouTube-Thumbnail-1-1024x576.png)
